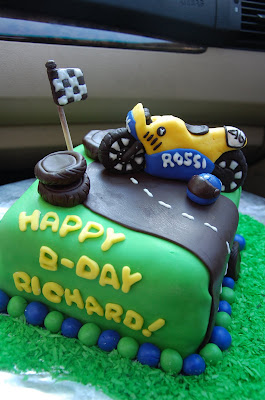
I have been doing specialty cakes for friends and a few referrals have come from it and I am really excited to learn more as I go. I recently did a cake for a woman that was surprising her lucky hubby with a "Valentino Rossi Cake" for his 45th. I molded the race bike and all the elements on the cake with store bought gum paste. The track and tires were "Duff from Charm City Cakes" new line of chocolate fondant. I can't rave enough about it. Perfect to work with & delish!! Buy it, it is sold at Micheal's Craft. Because fondant takes longer to dry and has a tendency to crack easily, I am going to make the next cake details out of gum paste using this recipe I saw on youtube. It looks like a perfect consistancy and should be soft not sticky. Make sure to cure in a zip lock bag in the fridge for 24 hours before using so that the paste can mature.
Recipe for { Perfect Gum Paste }...using Tylose powder
Ingredients: 4 large egg whites 2 lb. bag of powdered sugar 12 level teaspoons Tylose powder
4 teaspoons shortening (Crisco)
1. Place the egg whites in a Kitchen Aid mixer bowl, fitted with the flat paddle. 2. Turn the mixer on high speed for 10 seconds to break up the egg whites. 3. Reserve 2/3 cup of the powdered sugar and set aside. 4. Turn the mixer to the lowest speed, slowly add the remaining sugar. This will make a soft consistency royal icing. 5. Turn up the speed to setting 3 or 4 for about two minutes. During this time measure the tylose in to a small container. 6. Make sure the mixture is at the soft-peak stage. It should look shiny, like meringue and the peaks fall over. (If coloring the entire batch, add the paste color at this stage, making it a shade darker than the desired color). 7. Turn the mixer to the slow setting and sprinkle the Tylose in over a 5 second time period. Next, turn the speed up to the high setting for a few seconds. (This will thicken the mixture). 8. Scrape the mixture out of the bowl onto a work surface that has been sprinkles with the reserved 2/3 cup powdered sugar. Place the shortening on your hands and knead the paste, adding enough of the powdered sugar to form a soft but not sticky dough. Usually I check by pinching with my fingers and they should come away clean. Place the finished paste in a zip lock bag, then place the bagged pasted dough in a second bag and seal well.
Happy cake making peeps!!

