Jan 6, 2011

{Someone's Beautiful Creation, that I must post}


This is my favorite cake of all time. I found this pic on stumbleupon.com and I wish I had a reason to have my hand at re-creating it. Love the bloomers and laundry in all different colors of fondant. I just think it is so beautifully done and if anyone knows the baker & creator please let me know but in the meantime I just had to post it!

Take care & happy baking!

Dec 30, 2010

{PRADA cake for the girl that has everything}

At first I thought this cake was going to drive me crazy, sometimes the simplest box shapes can be the most difficult because they have to look perfect.

Everything really started to come together after the shoe finally started to harden after almost 12 hours in the fridge. I do not have gum tex but could have added that to speed up the drying which I will make sure to have in the future. Super happy with how it looks. Love the cake board covered in matching fabric and piped royal icing roses I think came out yummy and very pretty. I painted the shoe with silver luster dust and lemon extract and the entire cake and decor is (DUFF's RED buttercream fondant.) Highly recommend his black and red fondants. They are super expensive but taste the best and are really a quality ingredient to work with.

The little purse was a last minute idea because I thought it needed some balance on that side. I just love it and Diana the birthday girl was thrilled with it also.

Email me with any requests, I'm working on the new domain name & website so stay tuned!

Dec 28, 2010

{Diva Cake}

This cake was one of the most fun and challenging cakes to date. I worked with a "pillow cake pan" really not necessary but it was a last minute cake order and I wanted it to come out perfect so I splurged and purchased the pans. I only ended up using one because the cake was huge when I put them together so I used one and covered that with coral dyed fondant and ran the rope along the edge. One thing I will say is that there is no waste of cake when you use the pillow pans and they come out almost perfect after a little tweaking. The slipper is a chocolate candy mold I bought online and the entire cake is covered in fondant and the rope is painted with edible gold luster dust watered down with lemon juice and then applied by painting some corn syrup along the seam of the pillow to make it stick. I support the rope with some toothpicks until it dries the next morning, (that's a lil tip for you cake bakers out there).

{Peace Love & Cake}

sage mommy

{The Present Cake}

I'm siked for how this cake turned out. The client needed a cake for a holiday party & who would not love a cute two tier cake that was a Christmas present? The cake is vanilla bean white cake with a cooked raspberry drizzle and then iced with a cream cheese and coconut icing. VERY rich but soooo delish! The entire cake was done in fondant. Normally I would do the bow in gum paste because it sets up allot faster but I had bought a batch that was as hard as a rock and could not use it at all.

Everyone went crazy in the office when I arrived with it. Needless to say it came out very cute and I was given the nicest thank you from the client after!! I love when that happens. 


Dec 26, 2010

{ Scrabble Made out of Gingerbread }

I have a fondness for all things wordy and lettery, hense loving SCRABBLE. I made those scrabble necklaces and my little sister loved it! So I just stumbled onto this from a girl named Ali, she is the creative soul behind gimmesomeoven.com and I had to post it. Such a cute idea.


Here is the Method of pure cuteness:


Heat oven to 350F.
Prepare the gingerbread cookie dough.  Once it is ready, place a dough third on a large piece of lightly floured parchment paper or wax paper. Using a rolling pin, roll dough 1/8 inch thick. (Refrigerate again for 5-10 minutes to make it easier to cut out the cookies if needed.)
Using a knife or a pizza cutter, carefully cut the dough to make a grid of Scrabble tiles.  You can be as precise about this as you would like.  (Mine were not that precise!)  Actual Scrabble tiles measure 2 cm x 1.5 cm, so if you want to be exact, I would size them 1/2 cm smaller, knowing that they will expand slightly when cooked.  In American Scrabble, there are traditionally 100 tiles.  See the tip below for the letter and points distribution.
Once you have your desired amount of “tiles”, lay them out on a cookie sheet at least 1″ apart, and bake until crisp but not darkened, 7 to 9 minutes. Remove from oven. Let sit a few minutes and then use a metal spatula to transfer cookies to a wire rack to cool completely.
Prepare your Royal icing according to directions, and carefully make a strong border around the outside of each tile.  Then fill with the slighly diluted icing.  Use an edible marker to write a letter and point value on each “tile”.
Then use them to play, eat, and enjoy!!


  • 2 blank tiles (scoring 0 points)
  • 1 pointE ×12A ×9I ×9O ×8N ×6R ×6T ×6L ×4S ×4U ×4
  • 2 pointsD ×4G ×3
  • 3 pointsB ×2C ×2M ×2P ×2
  • 4 pointsF ×2H ×2V ×2W ×2Y ×2
  • 5 pointsK ×1
  • 8 pointsJ ×1X ×1
  • 10 pointsQ ×1Z ×1

{ Just a Quicky }

This is for my little man that I love with all my heart. I was a different person before he arrived in my life  { mncydf6gdgdycgsy } this giberish is my son's first official blog post!! He came over just now while I was typing and told me he loves his room and he loves me:))). This is what LIFE is really about.

Hope your holiday was fantastic!

Sage Mommy

Dec 22, 2010

{ Reindeer Holiday Gift Tags }

I love this blog eatdrinkchic.com, its really a great place when i'm looking for a jam label or cute gift tag. She has great taste and a real eye for simple classic design. I fell for these reindeer tags and they will adorn every present. Just stop and get the craft brads and a whole puncher and you are ready to get started. 
PAPER REINDEER POSTCARD
What you will need:
  • A4 Kraft card
  • A4 White, textured card
  • 4 craft brads
  • Double-sided tape
  • Scissors
  • 3mm circle craft punch
  • Colour Printer
  • Paper Reindeer Postcard design 
  • Scalpel
  • Ruler
Instructions:
Download the 'Paper Reindeer Postcard' PDF below and print out onto white card using a colour printer. Using a pair of scissors, cut around the separate parts of the reindeer leaving some white around the edges. (Tip: You don't need to cut perfectly straight. In fact, a slightly irregular edge just creates a more whimsical, handmade feel.) Position the legs, antler and tail on the correct areas of the reindeer body and attach by punching holes and inserting and fastening craft brads. Cut out the 'happy holidays' banner, also leaving a white border around the edges.
Write your holiday message on the back &  Attach to wrapped gift.
Enjoy your night ...i'm going to cuddle with my little guy;)

Dec 16, 2010

{ Scrabble Necklace }

I know u love it! So do I, it cost me 7.00 total to make including sterling chain. I thought it would be a very cute Christmas gift and looks so crafty & clever. Here goes the scenario on how you can go about making this gem.

Dec 14, 2010

Matcha Christmas Tree Cookies

I love making holiday cookies and using royal icing to decorate them. I love how smooth and matte the finish comes out & how professional and clean they look.

This recipe is easy and really delish! The design is simple to do and looks so pretty all piled up with ribbon around it!

You can find these dragees at Micheals or some other craft store and the swirl design anyone can do. Just shows that the simpliest of designs are sometimes the best!


SUGAR COOKIE INGREDIENTS
    * 2 3/4 cups all-purpose flour
    * 2 tsp of Matcha Tea powder
    * 1 teaspoon baking soda
    * 1/2 teaspoon baking powder
    * 1 cup softened not melted butter
    * 1 1/2 cups white sugar
    * 1 egg
    * 1 teaspoon pure vanilla extract
    * 3 tablespoons milk
 
DIRECTIONS:
1. In a small bowl, stir together Matcha, flour, baking soda, and baking powder. Set aside.
2. In a large bowl, cream together butter and sugar until smooth. Beat in the egg and vanilla. Gradually blend in dry ingredients. Add enough of the milk to moisten the dough and make it soft, not wet.
3. Roll dough into a ball and freeze for 15 minutes.
4. Preheat oven to 375 degrees F.
5. Roll dough to a 1/4-inch thickness on a floured surface, and cut with a 3-inch Christmas tree-shaped cookie cutter. Place 2 inches apart on ungreased baking sheets.
6. Bake at 350° for 8 to 10 minutes or until slightly golden. Let stand for 2 minutes before removing to cool on a rack.
7. Frost outline of a tree around the cookie. After a few minutes flood the middle with the same royal icing to get a clean smooth finish. Decorate as desired.


ROYAL ICING INGREDIENTS

2 large egg whites
2 teaspoons fresh lemon juice
3 cups powdered sugar, sifted
3 tablespoons of ONO Matcha tea


DIRECTIONS:

1. Sift the ONO Matcha and powdered sugar together. Set aside.
2. In the bowl of your electric mixer (or with a hand mixer), beat the egg whites with the lemon juice. Add the sifted powdered sugar tea mix and beat on low speed until combined and smooth.
3. The icing needs to be used immediately or transferred to an airtight container as royal icing hardens when exposed to air. Cover with plastic wrap when not in use.


These are not only yummy but so unique and pretty, everyone will flip for them!

Happy Holidays people..sage mommy


Dec 10, 2010

{ Sushipot, A Handmade Artists I Just Love }

You have to wonder what to do with the great vintage puzzle you picked up at a tag sale but your crazy little son has lost all the pieces to it and you now spend a good portion of everyday vacuuming them up. Well stop, because after being up for way too many hours making fondant love birds I stumbled upon this lady who is so creative and I adore her sense of color and style.
Above is an old cigar box that she decoupaged...i know its so cute! Now look at this lost puzzle piece fashioned into a Christmas ornament...brilliant again!


This wacky take on a dollhouse is great. The medical illistration has just the right punch of color to make this a serious piece of art but still keep it fun.


I would love to see what I have around this house of mine to come up with something whimsy. Please go check out her site on Etsy.com

SUSHIPOT

Nov 19, 2010

{ Thanksgiving Centerpiece }


Maybe even "Family" or just "Give Thanks" for Christmas you could even do "Believe" with pretty red letters and a plaid background. I just love a themed holiday. 

I'm trying to do a all plaid tree this year so Im excited to start posting about Tree decor, stay tuned!

Nov 1, 2010

{ Tinkerbell Cake Done Organic Style }

If I had to pick my favorite cake ever, this is it. Custom stand I made, organic and peanut, gluten & wheat free to boot. That was the clients request and the facility ( KIDS U ) ended up being peanut free so Thank God for checking the website prior to making the cake or it would not have been allowed in.

It all starts with the stand which was fairly easy with a little planning ahead. Measure the pans and figure the structure and just put the pieces together using 1/2 inch plywood and a large square dowel in the middle held together by tiny "L" brackets on the top and bottom which I covered in plastic wrap and screwed down so not to touch the cake.


I chose a round piece of wood for top so it would resemble a tree better and planned to have the leaves hang over the side to hide any imperfections.


After frosting the bottom layer in pink buttercream icing I started to make the trunk out of cut pieces of fondant which I folded to make roots and a trunk. I adore the tiny mushrooms around tinks big old tree! 

They are the cutest thing ever.

view from above, the tree looks good enough to have lunch under. I think it turned out great! The client went nuts and her daughter loved it too!


Enjoy and let me know what you think!!

Oct 22, 2010

{ Unique Coated Apples }


Everyone LOVES a candy apples!! How good are they in the fall all covered in caramel & rolled in salty nuts, how bout those chocolate covered apples with layers and layers of different drizzles of dark & milk chocolate...OMG! 

I saw this on Martha's web and thought how cute to just melt 2 bags of white melting chocolates with 2 tablespoons of light corn syrup until blended and thick but not bubbling. Coat each apple...let it dry for about 1/2 hour and coat again until totally white. After they FULLY dry, just draw eyes and a spooky mouth with edible marker. Soooo cute!!


These whoopie pies look great too!!

Oct 5, 2010

{ Leopard Stripes For a Stylish Ladies B-Day }

Wanted to post this cake because it was the first time I did a peanut butter and chocolate cake & it was fantastic. She is newly engaged and her fiance rang me to ask for a special leopard striped cake with pink in it. I have been dying to use feathers and this girl is the perfect chic to handle a lil wild in her cake! I covered the cake in pink fondant and hand painted the stripes in edible black icing. I made a "V" to add a little something...funny that my sister's cake required the same thing;). I think it came out really perfect and she loved it!

Hope this post finds you well!!

Sage Mommy

Sep 29, 2010

{ Maker's Mark Cake }

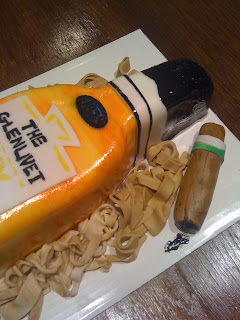
So during a Estate Sale prep today I started talking about this cake I did and realized I loved how it came out and never posted it. So here is the low down, chocolate bourbon cake with a chocolate buttercream filling and covered in white fondant. 

This is my first attempt at hand painting a cake but I printed a picture out of the "Maker's Mark" Bottle and  just started mixing edible icing color together until I reached a bourbon like caramel color. I sponged it on dragging the color down & across first. I let the cake dry and then added the fondant label and dripped melted chocolate dyed red to look like the all known "wax dipped" top. Maker's mark is known for! 

I love this cake and Brendon loved it too! His girlfriend wanted to surprise him and she did with sky diving and a handmade Kentucky style birthday cake!!

Thanks, Sage Mommy


Sep 27, 2010

{Super Easy Ghostly Cupcakes}

Don't you just LOVE these...I do. They are so easy and they look like you worked all day on them. I went ahead and used a box mix when I discovered I was out of flour but still devilishly delish! Chocolate ganache icing and then rolled the sides only in chocolate jimmys.

Now for the ghost:
This little number is draped over a marshmallow that I snipped with scissors to make more round at the top.


Roll out your store bought white fondant, I used Wilton white. Use a ravioli cutter or cookie cutter & make a small enough circle that it will
sit on the cupcake and not (over) it. 


Stand your marshmallow up and drape the fondant over. 
Then trim the bottom (of the marshmallow) as needed so it sits flat on cupcake

Add two dots with an edible black marker and carefully place on this little masterpiece. Your people will think you are soooooo clever;)


HAPPY HALLOWEEN!!!

Sep 25, 2010

Jeannie's Engagement Cake!!!!

So sorry for the delay in posts!  Life has been crazy with LOTS of ups and plenty of DOWNS.  So I said that I would post the pics of the engagement cake I did for my sister Jeannie. To say the least, Mike & I ate the thing for hours while baking and it was delicious! Lemon cake with coconut buttercream...FABULOUS!!! The party was a blast and everyone had a great time (maybe too good a time) it took me a week to get back to normal.


So here it is.. I called a florist and requested flowers that were pestiside free and safe for cakes. I then wrapped all the stems in sran wrap and tapped them around before sticking them in the top of the cake to secure. I went with fresh antique hydrangia and some orangey colored roses to match the umbrellas. 

I twisted a "V" as planned out of wire and wrapped the whole thing in silk sage ribbon. 

A word to the wise...a cake this big needs to be very cold before sitting out for hours but it turned out great and my sis was sooooo happy!

Nite Nite, Sage mommy


Sep 14, 2010

{Engagement Cake}

So my sister does not read this blog so I can talk freely about her gift on here. She is engaged to the man of her dreams and her swaree' (not spelled right) is this Sunday. I....my good people have been chosen to do the cake. Not to mention this family are caterers and his aunt is a great pastry chef so no pressure?? right.

I have decided to go with a lemon pound cake with coconut buttercream and cover the whole thing in the most delicate of sage green fondant and a bunch of fully bloomed sugar flowers on the top. Also thinking to top it off with some winter white butterflies stuck to the side of the cake...she loves butterflies! Here are the inspiration pics I'm using and I'll post the cake for all to see!!

I love the bottom layer color of this fondant...

I'm doing the fallen pedal thing along the side which is so elegant!


I have to do the "V" her new last name is viesta and our last name is with a "V" also, I just don't know where to incorporate this yet? Any ideas, feel free to comment;)

Sep 12, 2010

{ JAMAICAN BLACK BEAN SOUP WITH CILANTRO CREAM }

INGREDIENTS
2 cups dried black beans, picked over and rinsed
2 or 3 tablespoons olive oil
1 red onion, diced
1 red bell pepper, cored, seeded and diced
2 carrots, peeled and diced
4 ribs celery, diced
2 jalapenos, diced with seeds
8 garlic cloves, minced
1 Granny Smith or other tart apple, peeled, cored, and diced
1 tablespoon dried basil
8 cups chicken stock
4 bay leaves
2 teaspoons salt
freshly ground black pepper
juice of 1 limes
2 scallions, thinly sliced (for garnish, optional)


(For the cilantro cream)
1/2 cup  sour cream
2 tablespoons chopped fresh cilantro
juice of 1 lime
2 scallions, thinly sliced (for garnish)
METHOD
Quick soak the beans:  Place the beans in a large pot and cover with water by 3 inches.  Bring to a boil, reduce heat and simmer uncovered for 45 minutes.  Remove from heat, drain, and set aside.
While the beans are cooking, heat the oil in a large saucepan over medium-low heat, add the onion and cook, stirring for about 10 minutes, until softened.  Add the red bell pepper, carrots, celery, and jalapenos and cook, stirring for about 10 more minutes.  Add the garlic and cook for 2 minutes longer.  Add the apple, basil, broth, bay leaves, salt and pepper, and drained beans.  Stir to blend.  Bring to a low boil.  Reduce heat and simmer, uncovered, 1 to 1 1/4 hours, until the beans are tender.
THIS SOUP IS FABULOUS AND THE APPLE IS THE BEST PART, DON'T PUREE THE SOUP TOO MUCH BECAUSE THE TEXTURE OF THE APPLE IS A GREAT SURPRISE AMONGST THE SPICY BEANS. DELISH!

Sep 10, 2010

DIY Framed Earring Holder

I have been wanting to make this for awhile but just have not gotten around to it. This project cost me $2!! I have always kept my earrings in a plastic little organizer. The plastic container was just getting too full and my earrings were getting too big to fit into the compartments, so I came up with this idea. I have seen people do things similar to this but maybe not exactly like this.

I started with an old frame I already had and painted it a cream color. 


Here is everything you will need, OH YEAH...a pair of tin snips really will do the trick ($8 at Home Center)

Cut the chicken wire to go over the back off the frame like the picture shows & staple all around taking care to get the staples in between the mesh and pull it nice and tight.

Next...
Cut the fabric a tad bit larger then the chicken wire and then staple the fabric along the edges of the frame.

WALLA!!!!

PLEASE ENJOY AND HANG WITH PRIDE...SAGE MOMMY

Aug 2, 2010

{Turning 40 with Friends Cake}

I have decided to start drawing out my designs first for clients so that they can get a feel of the cake and maybe make some changes also. Debbie first contacted me last year about a sweet 16 cake for her daughter. The cake she emailed me that she loved was absolutely gorgeous and I was so disappointed when I had to turn it down on account of another cake job! She was so great though and contacted me last month again about a 40th birthday cake.


I learned when I delivered her the cake that it was for a joint birthday party for her and a few girlfriends who had also recently turned 40! Too fun! I think it came out pretty perfect. Thanks Debbie for the picture. (Why is my pretty cake on the floor girl??)

Jul 3, 2010

{ Perfectly Delicious Stiff Cupcake Frosting }


This is a great frosting that I used for these chocolate cupcakes with caramel drizzle. It stays put so you can do some nice detailed piping without the whole thing falling. Creamy and delish!!
Ingedients:
1 cup whole milk
5 Tbs flour
1 tsp vanilla
1 cup butter
1 cup granulated sugar (do not use powdered sugar)
Optional: food coloring
In a small saucepan, mix the flour and milk until combined. Heat over medium heat, stirring constantly with a whisk, until mixture thickens (and is just about to boil). Remove from heat and let it cool completely to room temperature.  Stir in vanilla.
In a large mixing bowl (a stand mixer works best for this) cream the butter and sugar until light and fluffy. Beat in the cooled milk mixture and beat for 5-7 minutes, until frosting is light, fluffy and completely uniform throughout.  Beat in food coloring, if desired.
This frosting looks best when piped with a large decorating tip (1M), but can also be spread with a spatula.
Yield: frosting for one cake or about 24 cupcakes

Jun 30, 2010

{ Cupcake Stand...u already have }

The structure itself was a stroke of brilliance. While I'd like to take credit for this bit of genius, I can't. And I can't believe I can't find the blog post I found it in! At any rate, all this is is a few cake circles I covered in paper to match the rest of the party, and a few soup cans wrapped in paper all stacked up. Just a tip if you're going to this -- make sure your soup cans are full and unopened. The weight is what keeps it together! You can find pre-cut cake circles in the cake decorating aisles at WalMart, Michaels or any similar store. It was a good alternative to a tower that would have to be stored after I used it! Spray adhesive works excellent with this project too!!

Jun 20, 2010

{ Paint the Town Red or Better Yet Tan }

After spending a great Father's Day by the pool with the kids and friends I am finally home at the computer putting in a bit of work.

I have been doing a bit of color consulting lately and wanted to post a picture of a staging job that I did with a great color scheme but it just needed to be more "dramatic without distracting" to the buyers.

This was a great space, filled with light and a fireplace! That is always a winning factor for a buyer in the northeast. But lacked the furniture and accents that finished the look. Here is a little list that is KEY thinking when making the home buyer ready. After being painted and fully staged...I love how it turned out and the space had an offer in 8 days after being on the market for 121 days.


When sellers are repainting their houses prior to listing I choose a neutral theme of only three colors.  The exact paint color scheme is selected depending on floor color and other architectural elements (fireplace surrounds, cabinets, tile etc.) and the style of the house.  For the main color I use a neutral hue-usually a golden or taupe tan.  For one or two accent walls I use a darker coordinating shade of gold or brown or clay.  I use a lighter tint of the main color for the bathrooms and kitchen.  These color schemes give the house interest and drama without being distracting.  This also gives buyers a great starting base to add more colors as they choose.


I always use an eggshell finish because it is easy to clean and reflects light well helping to brighten rooms.  Flat paints are best for hiding flaws in the walls but they absorb light, which can make rooms feel darker, and they are hard to clean.  Pearl finish has a low sheen and makes colors brighter and more intense, I like it for doors and trim.

Color groups are referred to in terms of temperature.  Reds, oranges and yellows are considered warm tones and add intensity and energy.  Greens, blues and purples are considered cool colors and have a calming effect.  Brown and orange are strong warm color examples great for accent walls.  Steel blue, gray (Benjamin Moore Templeton gray) are excellent colors on the cool side of the color wheel, great in bedrooms.


Let me know if this was helpful, I love to hear your feedback.

Jun 16, 2010

{ My Favorite Homemade Father's Day Card }

This year I wanted to plan something cute for Father's Day, something inexpensive but from the heart? I love these cards from marthastewart.com and even though they are a little tough to make they are adorable once finished. (I've been practicing for 20 minutes now). Make sure to use some cool patterned paper to really make this project pop.

Here are the directions:

Use legal-size (8 1/2-by-14-inch) decorative paper.
1. Place paper facedown. Fold in half vertically; unfold. Line up left edge with centerline fold, and crease; repeat with right edge. Unfold, and lay flat.
2. Fold top-left corner in to line up with outermost crease, forming a triangle; repeat on top-right corner. Using index fingers and thumbs, pinch together outside points of each triangle so they meet, and crease.
3. While still pinching triangles, fold down top edge (this will make sleeves).
4. Turn paper upside down, and flip it over. Fold down top edge 3/4 inch.
5. Flip paper over. Fold top left and right corners so tips meet at centerline.
6. Tuck bottom edge under collar, and flatten by creasing. For the tie, cut out an 8-by-1/2-inch strip of decorative paper. Knot paper. Snip close to knot on one side; trim other to a point. Glue to shirt.
Don't forget to add a cute message to your favorite daddy like, olive u soooo much Mike! You are my favorite daddy.

Jun 15, 2010

{Free Paint Party Invitations}

I spotted these while trying to figure out an inexpensive way of inviting friends over for a paint party later this summer.

How adorable...right? Just grab a bunch of cute paint sample cards and type away! If you don't have a type writer, your local library will have one (I called to check).


I love the "COLOR ME HAPPY" on the bottom. So creative and a great idea for those samples that usually end up in a pile somewhere.


Hope this post finds someone well!

Love, Sage Mommy

Jun 5, 2010

{ Stairway to Heaven or the laundry room}

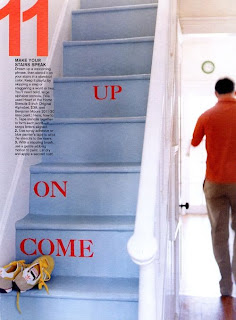
I saw this a while ago and decided to save it to post about when I was ready to start thinking about what to do with my basement stairs. I am in the process of turning my basement into a rental and it is a slow moving process to say the least;)

I love how whimsy this project is and with some leftover paint and a little creativity with words or numbers you can transform something mundane to a great focal point. I love the numbers and would def. put a thick coat of polyurethane over the entire project to ensure you aren't touching up for years.


The outline of black finishes this off and I love the type set they chose. Great for little ones (like mine) who are just starting to count everything.


This beachy shade of blue goes so well with the stark white of the space. Even the huge guilded mirror ends up working. I can't make out the words along the bottom but I love the idea of a great saying across them.


I hope this post finds you well and happy decorating. Email me a picture if you end up doing this or have any cute ideas for me...I would love to hear them.

xoxo, Sage Mommy